Introduction to Spanish Peanuts
Spanish peanuts belong to one of the major market types of cultivated peanut and are especially valued for confectionery use, peanut candy, oil production, and roasting. Compared with Virginia and Runner types, they generally have smaller seeds, a more compact and upright plant habit, and shorter growing seasons, often making them a practical choice in regions with a limited warm season or in systems that need quicker field turnover.
Historically, the name “Spanish” refers to an old market classification rather than a modern national origin. This type became widely associated with dryland production and oil-rich kernels, and in many regions it developed a reputation for dependable yields under relatively lean conditions. Growers still choose it for its early maturity, concentrated pod set, and ease of harvest where soils are light and friable.
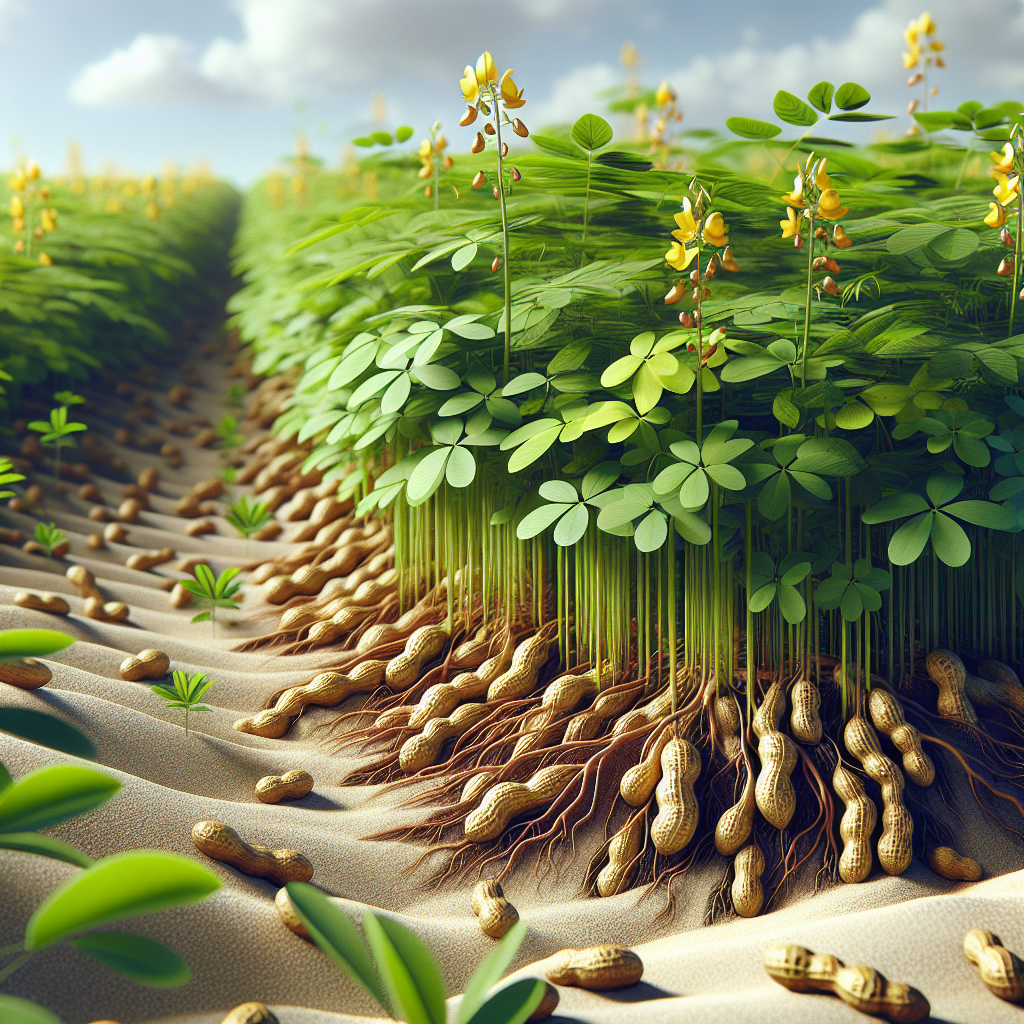
From a production standpoint, this crop is unusual because it flowers above ground but fruits below ground. After pollination, the fertilized ovary elongates into a peg, which pushes into the soil and develops into a pod underground. That means management is not just about feeding leaves and stems; it is equally about maintaining a soil surface soft enough for peg penetration, sufficiently moist for pod fill, and sufficiently aerated to avoid rot.
For growers comparing peanut classes, see the broader Peanuts guide. For field preparation and fertility-building concepts that strongly affect pod quality, the principles in soil health strategies are also useful.
Botanical Profile of Spanish Peanuts
This annual legume in the Fabaceae family is a self-pollinating species with a low-growing, branching habit, though Spanish types are usually more upright and compact than Runner peanuts. Plants commonly reach about 30 to 60 cm tall, depending on cultivar, fertility, moisture, and planting density. Leaves are pinnate with four leaflets, and the plant produces small yellow to orange-yellow papilionaceous flowers near the lower nodes.
A key botanical feature is geocarpy, the rare habit of producing fruit underground. After fertilization, a structure called the gynophore, commonly called the peg, elongates downward. Successful yield depends on this peg entering loose soil within a short period after flowering. If the topsoil crusts, dries hard, or becomes waterlogged, peg penetration and pod formation are reduced.
Spanish types usually have smaller pods and kernels than Virginia types, with kernels covered in a characteristic reddish seed coat. Their oil content is often relatively high, which is one reason they are favored in some oil-processing and roasting markets. They also tend to mature earlier, often in roughly 90 to 120 days under warm conditions, though local cultivar and weather can shift this significantly.
Like other legumes, they form symbiotic relationships with rhizobia that fix atmospheric nitrogen in root nodules. This means they often need less nitrogen fertilizer than many field crops, but successful nodulation depends on compatible bacteria being present in the soil or applied as inoculant. Excessive nitrogen can push lush vegetative growth at the expense of pegging and pod development.
Cultivar choice matters. Some Spanish peanut cultivars are bred for drought tolerance, some for better disease resistance, and others for confectionery quality or oil yield. In professional production, always match cultivar days-to-maturity, disease package, and seed size to local climate, disease pressure, and end market.
Soil, pH, and Climate Requirements for Spanish Peanuts
This crop is at its best in sandy loam, loamy sand, or other light-textured soils that are deep, loose, and exceptionally well drained. Heavy clay is usually a poor fit because it resists peg penetration, compacts easily, holds too much water, and makes digging more difficult and more damaging at harvest. A friable top 10 to 15 cm is especially important because that is the zone where pegging and early pod formation occur.
Ideal soil pH is generally 5.8 to 6.5, though plants can tolerate slightly broader conditions if drainage is excellent and nutrients are balanced. Below about pH 5.5, calcium and molybdenum availability may become limiting, nodulation can weaken, and aluminum or manganese toxicity risk rises. Above about pH 7.0, micronutrient imbalances, especially zinc or iron issues, may appear depending on soil type.
Spanish peanuts need a long, warm, frost-free season. Soil temperature at planting should be at least 18°C and preferably 20 to 22°C for strong, uniform emergence. Air temperatures around 25 to 30°C support vigorous vegetative growth, flowering, and pod fill. Growth slows markedly in cool weather, and even light frost can destroy the crop.
Rainfall or irrigation should be moderate and well distributed, with a practical seasonal target often around 500 to 700 mm depending on soil type, evapotranspiration, and planting date. Moisture is most critical from flowering through pod fill. However, this is not a crop that likes continuously wet soil. Saturated root zones reduce oxygen, impair nodulation, and sharply raise the risk of stem rot, pod rot, and seedling diseases.
Professionally, the target is consistent but not soggy moisture. In coarse sandy soils, aim to keep soil moisture in the active root zone roughly around 50 to 70% of field capacity during establishment, rising to about 60 to 80% during flowering and pegging, then tapering slightly near maturity to aid drying and harvest access. Practical field signs matter: if the topsoil turns powder-dry and pegs fail to enter easily, it is too dry; if plants yellow while soil remains wet and roots smell sour or show browning, it is too wet.
Calcium deserves special emphasis. Pods need direct calcium availability in the pegging zone because calcium moves poorly from leaves to developing pods. Even when leaf tissue looks healthy, a calcium-deficient pegging zone can cause pops, unfilled pods, poor seed quality, and darkened kernels. Where soil tests indicate need, gypsum is commonly applied at early bloom to enrich the topsoil without dramatically shifting pH.
Step-by-Step Planting & Propagation
Propagation is by seed, using raw, viable peanut kernels intended for planting rather than roasted or processed peanuts. Use high-germination, disease-free seed from a reputable source. Because kernels are fragile once shelled, handle them gently to avoid cracking the seed coat or embryo.
Start by preparing a fine, level seedbed. Remove stones, undecomposed debris, and clods that interfere with even seeding and later digging. In commercial fields, bedding or slight ridging can improve drainage in marginal soils, but extremely tall ridges are not always ideal if they dry too rapidly. The goal is a smooth, mellow surface that will stay open enough for pegging.
If peanuts have not been grown recently in the field, inoculate seed with the correct peanut rhizobium strain just before planting. This is particularly important in new ground. Follow inoculant label directions carefully, keep treated seed out of direct sun, and plant promptly.
Sow after all frost danger has passed and the soil is reliably warm. Planting depth is usually 4 to 6 cm in moist, light soil. In very sandy soils, slightly deeper placement may be acceptable if moisture is lower near the surface; in cooler or heavier soils, stay shallower to reduce emergence losses.
Spacing depends on scale and equipment, but common practice is 45 to 75 cm between rows and 10 to 15 cm between plants within the row. Narrower spacing can support earlier canopy closure and weed suppression, while wider rows can improve airflow and ease cultivation. Spanish types, being relatively compact, often tolerate moderately tighter spacing than larger, more sprawling market types.
After sowing, firm the soil lightly for good seed-to-soil contact, but do not compact the surface into a crust. Emergence usually occurs within 7 to 14 days in warm soil. If a heavy rain forms a crust before seedlings emerge, gentle mechanical crust-breaking between rows may be needed in larger systems.
Do not transplant unless absolutely necessary. Peanuts establish best when direct-seeded because root disturbance and broken pegs later reduce performance. In very short-season areas, some experimental starts in biodegradable plugs are possible, but this is generally not standard field practice and often does not justify the labor.
Care & Maintenance regimes for Spanish Peanuts
Early growth should focus on stand establishment, weed suppression, and root health. During the first 3 to 5 weeks, keep weeds out aggressively because young peanut plants are poor competitors. Shallow cultivation is effective before flowering, but once pegs begin entering the soil, deep or careless cultivation can destroy future pods.
Irrigation management is the most important routine task after stand establishment. During emergence, keep the upper root zone evenly moist but not saturated. A practical standard is to wet the top 10 to 15 cm thoroughly, then allow slight drying before the next irrigation. Once flowering starts, avoid moisture swings. Drought stress during bloom and pegging causes flower abortion, poor peg penetration, and reduced pod set. Water stress during pod fill reduces kernel size and increases blanks.
At the same time, overwatering is a common hidden yield killer. Symptoms include pale foliage despite adequate fertility, stunted growth in patches, increased disease at the crown, blackened pegs, and pods with rot or discoloration. In sandy fields under irrigation, shorter and more frequent events are usually better than heavy, infrequent soakings. In heavier soils, irrigation intervals must be longer to protect aeration.
Nutrient management should begin with a soil test. Peanuts generally require modest nitrogen if nodulation is good. Excess nitrogen often causes too much vine and leaf growth. Phosphorus and potassium should be corrected according to soil analysis, especially before planting. Potassium is important for stress tolerance and pod development, while phosphorus supports early root growth.
Calcium should be managed in the pegging zone, not just in the root zone. Where needed, gypsum is often applied around early flowering, commonly when plants are beginning to peg. This is especially important for large-seeded peanut types, but Spanish peanuts also benefit when soils are low in available calcium.
Magnesium, boron, sulfur, zinc, and molybdenum may need attention depending on soil tests. Boron is required only in small amounts, and overapplication can be toxic, so avoid guesswork. If leaves show generalized chlorosis or poor vigor despite normal macronutrient levels, tissue testing can clarify hidden deficiencies.
Hilling is generally not practiced the same way it is with potatoes; however, maintaining a loose, slightly mounded, weed-free surface around the base can help pegging if done early and gently. Mulches are used less often in broadacre systems because they can interfere with peg entry, but in garden-scale production a very light organic mulch between rows, kept away from the crown and pegging zone, can help moderate weeds without blocking fruiting.
Watch crop stages closely: emergence, early vegetative branching, first bloom, pegging, pod fill, and maturity. Spanish peanuts often mature more uniformly than sprawling types, which helps with scheduling. The last 2 to 3 weeks before harvest are a balancing act: enough moisture to prevent severe late stress, but not so much that digging is delayed or pod disease escalates.
Pests, Diseases & Organic Management
The main pest and disease profile varies by region, but several recurring threats deserve attention. Seedcorn maggot, Wireworms, White grubs, Thrips, Aphids, Leafhoppers, Armyworms, Cutworms, and Spider mites may all appear depending on climate and field history. Soil pests are especially damaging because they scar pods and reduce market quality.
Thrips are important not just for feeding damage but because they may vector viral diseases such as Tomato spotted wilt virus in some peanut-growing regions. Early symptoms include distorted young leaves, bronzing, stunting, and ring spots. Management starts with resistant cultivars where available, planting date adjustment, weed control around field borders, and careful monitoring rather than relying on rescue action after infection is established.
Leaf spot diseases, both early and Late leaf spot, are among the most economically important peanut diseases worldwide. They begin as small dark lesions on foliage and can lead to defoliation, reduced photosynthesis, poor pod fill, and harvest losses. Organic management depends on crop rotation, sanitation, excellent airflow, avoiding excessive leaf wetness, and timely biological or approved protectant sprays where permitted.
Southern stem rot, Rhizoctonia limb rot, and various Pod rots thrive in warm, wet, residue-rich conditions. Plants may wilt suddenly, show white fungal growth near the crown, or develop decayed pegs and pods underground. These diseases are strongly linked to poor drainage, excess irrigation, and continuous peanut culture. Rotate for at least 2 to 3 years with non-host crops such as cereals. Corn is often a useful break crop in peanut rotations because it interrupts many disease cycles and supports cleaner field structure.
Nematodes can also reduce vigor, nodulation, and yield. Root-knot species may cause root galling and predispose plants to drought stress. Rotation, organic matter improvement, resistant varieties where available, and solarization in small plots can help.
For organic and low-input systems, integrated management works best:
- rotate away from peanuts and other susceptible legumes for multiple seasons
- use certified clean seed and resistant cultivars where possible
- avoid planting into cold, wet soil
- maintain balanced fertility rather than lush nitrogen-driven canopies
- irrigate in the morning so foliage dries faster
- scout weekly, especially from early flowering onward
- encourage beneficial insects with border plantings of Thyme, Yarrow, or Nasturtium near but not crowding the field
- remove volunteer peanuts and unmanaged weed hosts
When using approved organic sprays such as neem, insecticidal soaps, Bacillus-based products, copper, sulfur, or biological fungicides, timing matters more than force. Apply when pest thresholds are first exceeded and always rotate modes of action, even in organic systems, to reduce selection pressure.
Harvesting, Curing & Optimal Storage
Harvest timing determines both yield and quality. Dig too early and many pods are immature, with low kernel weight and poor flavor. Dig too late and mature pods may detach from the pegs and remain in the soil, especially in dry or overly hard ground. Spanish peanuts often mature earlier than other market types, but do not rely on calendar days alone.
Maturity assessment should include pod sampling from several parts of the field. Uproot representative plants, wash the pods, and check pod fill and inner hull color development. Mature pods are well filled, firm, and show darker internal mesocarp coloration depending on the maturity profile used locally. Plants also begin natural yellowing, but foliage color alone is not precise enough.
In small-scale production, loosen soil carefully with a fork or digger, lifting the entire plant to avoid stripping pods. In field-scale production, a digger-shaker is used to undercut plants, shake off excess soil, and invert vines so pods can begin drying. Soil moisture at digging should be moderate: if soil is too wet, pods stay muddy and curing is slow; if too dry and hard, many pods are left behind.
After digging, cure plants in windrows or under cover with excellent airflow until pod moisture drops sufficiently. The aim is gradual drying, not scorching heat. Ideal curing conditions are warm, dry, and ventilated. Excessively hot curing can damage kernel flavor and viability; damp curing invites mold. In practical terms, pods are ready for stripping and storage when shells are dry and brittle enough to crack cleanly, and kernels are no longer soft or rubbery.
For long storage, dry pods to roughly 8 to 10% moisture for in-shell storage, or slightly lower for shelled kernels intended for safe holding. Store in a cool, dry, dark, well-ventilated place. Temperatures below 13 to 15°C with low relative humidity are excellent for preserving quality. Avoid humid rooms, sealed containers with residual moisture, and any storage area with rodent access.
Aflatoxin risk must be taken seriously. Drought stress late in the season, insect damage, delayed harvest, and poor drying can all favor Aspergillus infection and toxin contamination. Never store visibly moldy, insect-damaged, or damp peanuts. Sort aggressively, dry promptly, and keep storage humidity low.
Companion Planting for Spanish Peanuts
Companion planting around this crop is less about classic backyard folklore and more about field function: attracting beneficial insects, moderating pest pressure, and improving border diversity without interfering with pegging and harvest. Because the pods develop underground, the immediate row zone must stay clear, open, and easy to cultivate, so the best companions are usually planted on margins, strip edges, or alternating beds rather than directly crowding the peanut row.
Thyme is useful on borders because its flowers attract pollinators and predatory insects while the plant remains relatively low and manageable. Yarrow is particularly valuable as an insectary plant, drawing hoverflies, parasitic wasps, and other beneficials that help regulate soft-bodied pests. Nasturtium can function as a trap or distraction plant for certain chewing and sap-feeding insects in garden-scale systems.
If integrating a rotational companion rather than a same-bed companion, cereal strips can help break pest and disease cycles and improve field logistics. Keep in mind, however, that anything tall or aggressive placed too near peanut rows can cast shade, compete for water, and hinder harvest access.
Avoid close companions that demand repeated deep cultivation, heavy irrigation, or dense mulching over the pegging zone. Also avoid crowding with vigorous vines that can tangle with peanut foliage. In production blocks, think of companion planting as ecological support around the peanut crop, not on top of it.